Thursday, August 20, 2009
Saturday, August 15, 2009
The Sill Plate


The sill plate is the means to connect the wooden framing to the cement stem wall. Place J bolts about every two feet in the cement at the top of the stem wall while it is still wet. After the cement dries attach a redwood or a treated 2x8 or 2x6 to the stem wall, depending on the size of the studs on your walls, with appropriate nuts and washers. We used a 2x8 green board since we have 2x6 redwood walls.
Thursday, August 6, 2009
The Stem Wall

 We chose not to use foam forms for creating the stemwall, both because of price and because having foam on both sides of the concrete negated it's mass inside the greenhouse. Instead, we rented plywood forms to pour the cement into, which we removed after the cement hardened. We then placed 1 1/2 " rigid insulation around the exterior.
We also chose to have the stemwall extend six inches above the planned 2 1/2 ft planting
 beds. Since ground level in the greenhouse was even with the bottom of the 7" footer, the stemwall ended up being 29" high. It is 8" thick. We ran 2- half inch horizontal pieces of rebar inside the wall attached to the 1/2 " uprights that were embedded in the footer, this is according to code. Aferward, we found that we liked the feel of standing 2 ft. below ground level in the greenhouse with the substantial stemwall surrounding us.


Naming Our Business


We have been fervently attempting to come up the the perfect business name that conveys what we want it to, yet is somewhat original and resonates with both of us.
What do you think of "Two Dorks and a Shovel?"
Tuesday, August 4, 2009
Underneath it All
Traditional greenhouses can overheat when the sun is out and freeze in it's absence. Typically, electrical or gas heating and cooling systems are installed to counteract adverse conditions. Our
 goal is a passive solar greenhouse, meaning it is "off the grid".
Our subterranean heating and cooling system uses the ground of the greenhouse as mass and a solar operated fan to help moderate the temperatures by pushing air slowly through the 4" perforated pipes. This system has the added benefit of keeping the roots of the plants warm and moist because it runs under the planting beds.
This is the Plenum, home-made made from a used hard plastic drum. It is a separate space compartment for air circulation. (heating, ventilation, cooling). The fan goes inside here.

 goal is a passive solar greenhouse, meaning it is "off the grid".
Our subterranean heating and cooling system uses the ground of the greenhouse as mass and a solar operated fan to help moderate the temperatures by pushing air slowly through the 4" perforated pipes. This system has the added benefit of keeping the roots of the
 plants warm and moist because it runs under the planting beds.
This is the Plenum, home-made made from a used hard plastic drum. It is a separate space compartment for air circulation. (heating, ventilation, cooling). The fan goes inside here.
Monday, August 3, 2009
Compost to the Rescue!
 Plants in aged compost (left) Newly started compost is cooking (right)
So this is what you might call a "duh" moment. A while back I ran out of room to plant the rest of the tomato and pepper plants that I had started from seed back in the day. Worse, they have been residing in undersized containers. So today as I was checking in on the status of my compost which has been cooking for two years now and is about done, it occured to me that since it is just....there, waiting for the greenhouse to finish, why don't I plant the plants in it. Eureka. I will report back in a couple of weeks as to their condition.
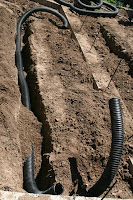
Ditch Witch
 No, this is not ditch (the) witch, something Erik has thought of a time or two.
This is the machine we used to dig 3 rows of 1 Ft deep x 7" wide trenches lengthwise along the floor of the greenhouse. This is where the drainpipe will go for the subterranean heating and cooling system which will be discussed in greater detail soon.
Sunday, August 2, 2009
Home Sweet Home (Depot)


Our home away from home. We trip down there at LEAST twice a weekend. We might be needing to join some kind of 12-step program for this habit of ours. Just say no. Live in the moment, breath just breath and count to ten.
Subscribe to:
Posts (Atom)
